

What Is The Last Step In The Cleaning And Sterilizing Process Of Surgical Instruments?
About this fact sheet
This fact sail has been adult past NSW Health to assist practitioners sterilise their reusable instruments. This will prevent the spread of illness, as well every bit enable practitioners meet the requirements of the Public Health Regulation 2022.
Sterilisation kills micro organisms including bacteria (and their spores), fungi and viruses. According to the Public Wellness Regulation 2022, all re-usable instruments which penetrate the pare must be sterilised.
Instruments which need to be sterilised
- Cuticle cutters
- Razor scrappers (callus remover shaver)
- Microdermabrasion heads
- Metal blast files (if they crusade pare abrasions)
- Dermarollers
Single-apply items
- Instruments that penetrate the skin and cannot be adequately cleaned and/or sterilised must not exist re-used, they must be 'single use'.
- Needles (including tattoo needles) must non be re-used. They must be 'single-use' and immediately disposed into an approved sharps container following use on a client.
How do you lot sterilise?
- Sterilisation must be carried out in accord with AS/NZS 4815:2006 Function-based health care facilities - Reprocessing of reusable medical and surgical instruments and equipment, and maintenance of the associated environment.
- This Australian Standard outlines the critical steps involved in sterilisation.
- See Steps to Cleaning and Sterilisation poster.
What practise you need to do before you sterilise your instruments?
- Ensure the premises is designed properly.
- Processing of equipment for cleaning and sterilisation should be conducted away from clients, preferably in a separate room.
- Workflow for equipment processing should exist from muddied - to clean - to sterile.
Equipment cleaning notes
- To protect against aerosol exposure from washing equipment soiled with contaminated materials (e.g. blood and body fluids) wear appropriate 'Personal Protective Equipment". That is, gloves, middle protection, fluid repellent masks and fluid resistant aprons or gowns should be worn whilst cleaning.
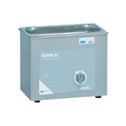
- Equipment must be thoroughly cleaned (i.e. via scrubbing, using an musical instrument washer, and/or ultra-sonic cleaner) before processing through a bench-pinnacle steriliser. However plastic and similar items may not be suitable for ultra-sonic cleaning and cemented glass syringes, mirrors, and lenses may exist damaged past repeated use.
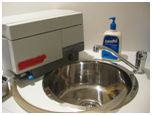
- Equipment cleaning should minimise the generation of aerosols. A deep double-bowl sink is recommended.
- Equipment that is hard to clean and sterilise, such as colonic lavage tubing should simply be used once and so thrown away (single-employ just).
- The manufacturer's instructions must be followed for the use of cleaning agents on instruments.
- In that location should be a manual for staff on 'cleaning procedures'.
- Adept quality potable h2o must be used for cleaning. H2o with a high mineral content is not suitable for rinsing as the instruments can go damaged past the mineral deposits.
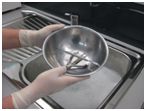
Equipment cleaning steps
(Instruments should be cleaned as presently every bit practicable after use)
Manual cleaning (where automatic washer units cannot be used or for difficult to clean instruments)
- Rinse off whatever visible blood and trunk fluids with common cold warm running water.
- Dismantle /open all items for cleaning:
- Fill the sink with warm water and with the required cleaning agent (approved by the manufacturer). Usually a neutral pH or mildly alkaline solution is used. Mildly acidic solutions may damage some instruments.
- Place in the sink.
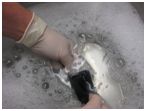
- Wash/scrub all surfaces under h2o with a soft brush, remove stubborn staining past using a non-annoying scouring pad or soaking in an approved stain-removing solution.
- Minimise the generation of aerosols. Some instruments should be cleaned using an instrument washer and/or an ultra-sonic cleaner.
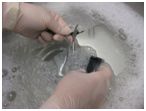
- Rinse in warm to hot running water.
- Dry all items using a drying cabinet or with a lint free cloth (Instruments must exist properly dried - residue moisture may impede the sterilisation process, and can damage instruments).
Automated (mechanical cleaning) (using a instrument washer, washer-disinfector or an ultra-sonic cleaner)
Washer cycles
- Pre-rinse with water.
- Wash, in warm water with cleaning agent added, in accord with the manufacturer's recommendations (All surfaces must exist exposed to the action of the h2o spray).
- One or more rinses with hot (80oC-86oC) h2o with a drying amanuensis added, in accordance with the manufacturer's recommendations.
- Bleed, leaving the contents at a temperature for quick drying.
- Drying.
Ultra-sonic cleaners
- Rinse off any visible claret and trunk fluids with warm running water.
- Dismantle /open all items for cleaning.
- Utilize the ultra-sonic cleaner in accord with the manufacturer'southward instructions.
- AS/NZS 4815:2006 titled Function-based health care facilities - Reprocessing of reusable medical and surgical instruments and equipment, and maintenance of the associated environment provides some instruction on the use of the ultra-sonic cleaner.
- Notation: Ultra-sonic cleaners make clean but exercise not disinfect instruments.
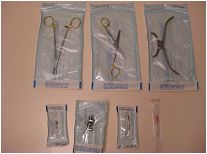
Packaging prior to sterilisation
- Instruments must be packaged and labelled prior to placing in a steriliser.
- Packaged items should be positioned in an upright position or in accord with the manufacturer's instructions.
- Almost packaging contains an indicator that shows that the load has been processed. This indicator does non show that the load has been sterilised.
- Class 5 indicators show that the critical parameters due east.thousand. time, temperature and moisture have been reached.
- Class 6 indicators verify that the cycle east.g. 134°C for iii.5min in steam has been reached.
- Exposed chemical indicators may change over time, therefore it is advisable to tape the outcome in a permanent register.
- Biological/enzymatic indicators or 'challenge tests' ensure that the sterilisation procedure effectively kills bacterial spores (reducing to below ten-half-dozen). Geobacillus stearothermophilus is the 'challenge exam' organism used to verify sterilisation past steam under pressure. Biological indicators are usually used during performance and operational qualification and as office of recommissioning and performance requalification.
Sterilisation and documentation requirements
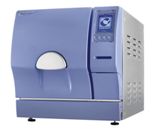
- Sterilisation must exist carried out in accord with Every bit/NZS 4815:2006 Office-based health care facilities - Reprocessing of reusable medical and surgical instruments and equipment, and maintenance of the associated environment.
- The demote-top steriliser must exist maintained in accord with Every bit 2182-1998 Sterilisers - Steam - Benchtop.
- All instruments must exist wrapped and packaged prior to processing through a demote-top steriliser. This will maintain sterility and permit aseptic removal of the contents of the pack at the fourth dimension of use. An exception to this requirement is if items are used immediately after processing through a bench-top steriliser.
- Equipment which is difficult to make clean and sterilise, should only be used one time and then thrown away (unmarried-use just).
- Equipment must exist thoroughly cleaned before processing through a bench-pinnacle steriliser.
- There must be at least one person nowadays at the time the steriliser is used who is adequately trained in the operation of the steriliser.
- The bench-top steriliser must have a print out facility to tape the bike parameters (i.e. temp, pressure level, time), otherwise a Course 4, 5 or 6 chemical indicator must be placed in on instrument package (in every load) or there must be straight observation and recording of bike parameters.
- Where on-site technical support is not available to achieve calibration or validation, a Grade five or half-dozen indicator must placed in every instrument package (in every load) or a process challenge device must be used in every load.
- The Public Wellness Regulation 2022 requires that sterilisation records must be kept for 12 months showing:
- the fourth dimension and appointment when each article was sterilised; and
- the length of time that the commodity was sterilised and the temperature and pressure level levels of the bench-tiptop steriliser.
- Cleaning and maintenance procedures.
- Quality Direction - in accordance with AS/NZS 4815:2006.
- Staff Grooming - in infection command and sterilisation direction.
- Operators and maintenance manuals - should be on site at all times.
- Validation - the process of commissioning and performance qualification which is performed to evaluate the reliability of a sterilisation process. Validation must be carried out annually.
Important notes for sterilising
- If a sterilisation package (pouch) or its contents are wet, the packet contents are deemed unsterile and must not be used.
- The efficiency of the sterilisation process must be established during the validation process.
- Instruments must be dismantled or opened to ensure that all parts of the instrument are sterilised.
- Trays used for assembly of musical instrument sets for steam sterilisation must exist perforated.
- Steam sterilisation is widely used as the steam nether pressure provides fast destructive power to kill microorganisms and their spores.
- UV lite cabinets, microwave ovens, pasteurisation, disinfectants, pressure cookers, boiling and ultra-sonic cleaners practice not sterilise!
- Dry heat sterilisation is only to be used for instruments which cannot be sterilised using steam nether pressure level (bench-peak steriliser). Dry out oestrus sterilisers (hot air type) must comply with Equally 2487.
- All instruments must exist wrapped and packaged prior to processing through a demote-height steriliser. This volition maintain sterility and permit aseptic removal of the contents of the pack at the time of use. An exception to this requirement is if items are used immediately subsequently processing through a bench-top steriliser.
Steps to cleaning and sterilising instruments
- Muddy instrument

- Place instrument in dirty instrument bowl/container
- Wear PPE (eg gloves, apron and mask
- Transfer to cleaning surface area
- Cleaning
- Open the instrument and rinse in a sink of warm water. Hot water may cause blood and other matter to stick to the items. (Soaking in some disinfectants may also cause blood to stick)
- Use a detergent recommended by the manufacturer
- Scrub with a brush to remove whatsoever grime (to reduce the generation of aerosols scrub underwater)
- Ultrasonic cleaner
- Very efficient for cleaning
- Suitable for some instruments
- Carry out foil test (run across As 2773.2)
- Packaging
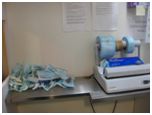
- Ensure instruments are properly dried utilise a lint gratis cloth or drying cabinet
- Open all instruments and place in package (pouch) without overlapping
- Seal the package properly do not utilise staples
- Label the package
- Sterilisation
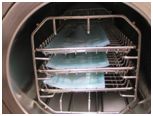
- TGA approved bench-summit steriliser with drying wheel and impress out facility (Comply with AS/NZs 4815:2006
- No overlapping of packages
- Indicators can be placed in packages to confirm sterilisation has taken place (otherwise validation reports are required)
- Storage
- Make clean, dry out surface area abroad from sunlight.
Related information and links
- PDF Poster - Steps to cleaning and sterilising instruments
- Skin penetration industry
You can call 1300 066 055 to talk to your local Public Health Unit.

Source: https://www.health.nsw.gov.au/environment/factsheets/Pages/how-to-sterilise-instruments.aspx
Posted by: millerponsin.blogspot.com
0 Response to "What Is The Last Step In The Cleaning And Sterilizing Process Of Surgical Instruments?"
Post a Comment